


Excavator center swivel joint, also called a center joint, rotary joint, or swivel joint, is a critical component in the travel hydraulic system.
It is installed between the upper structure and the undercarriage. Its job is to transfer hydraulic oil between the rotating upper structure and the lower travel system while allowing the excavator house to rotate continuously.
If the seals inside the center swivel joint become worn or damaged, hydraulic oil can leak between internal passages. This may cause weak travel, uneven tracking, pressure loss, or external oil leakage.
Replacing the seals can restore normal operation, but removing and rebuilding a center joint requires careful preparation. Incorrect disassembly or installation can damage hydraulic fittings, cut new seals, contaminate the hydraulic system, or even create additional travel problems.
This guide explains how an excavator center swivel joint works, when it should be removed, and how to disassemble, inspect, reseal, and reinstall it correctly.
1.What Does an Excavator Center Swivel Joint Do?
The center swivel joint is located near the center of the excavator swing bearing.
Hydraulic oil from the main control valve must pass from the upper structure to the travel motors in the undercarriage. Because the upper structure rotates while the undercarriage remains stationary, ordinary hydraulic hoses cannot directly connect the two sections.
The center swivel joint solves this problem.
Inside the joint are several independent circular oil passages. O-rings, backup rings, and other seals keep the different hydraulic circuits separated while the inner and outer sections rotate relative to each other.
During travel, hydraulic oil typically follows this path:
Main hydraulic pump → Main control valve → Center swivel joint → Left or right travel motor → Center swivel joint → Hydraulic return system
If the internal seals fail, high-pressure oil may leak into another passage instead of reaching the travel motor.
This is why center joint problems can sometimes look very similar to travel motor, main control valve, or hydraulic pump faults.
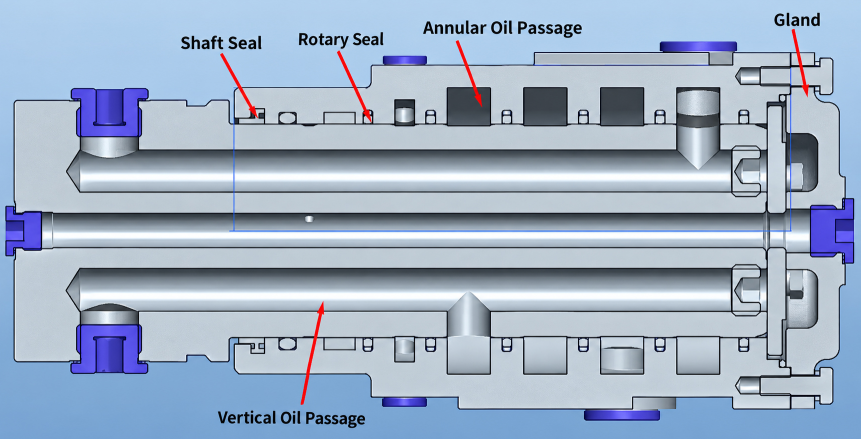
2.Common Symptoms of a Bad Excavator Center Swivel Joint
The occurrence of the following conditions may indicate an internal or external fault in the central swivel joint.
2.1 Excavator Pulls to One Side
If the excavator continuously travels toward one side even though both travel controls are operated equally, one travel circuit may be losing pressure.
Internal leakage inside the center joint is one possible cause.
Travel motor wear, pilot pressure imbalance, main control valve leakage, and pump flow imbalance should also be checked before removing the center joint.
2.2 One Side Has Weak Travel
When an internal seal separates a high-pressure passage from a low-pressure or return passage, seal failure can allow oil to bypass internally.
The result can be: Hydraulic pressure loss → Reduced travel motor torque → Weak travel on one side
In some cases, the problem becomes more noticeable after the hydraulic oil reaches operating temperature because thinner hot oil can leak more easily through worn clearances.
2.3 Travel Performance Changes in Forward and Reverse
Abnormal travel in both directions on the same side can also indicate a problem somewhere in that travel circuit.
Before condemning the center swivel joint, technicians should compare left and right travel pressure, pilot pressure, and travel motor case drain flow.
These tests help separate a center joint problem from a damaged travel motor or control valve.
2.4 External Hydraulic Oil Leakage
Visible oil around the center joint can result from worn O-rings, damaged dust seals, worn shaft surfaces, damaged housings, or loose hydraulic fittings.
External leakage does not automatically mean there is internal cross-port leakage, but the joint should be inspected before the problem becomes worse.
3.What Should Be Checked Before Removing the Center Joint?
Removing a center swivel joint can take significant time, especially on larger excavators.
Before starting, confirm that the fault is likely inside the center joint.
Compare the left and right travel systems. Measure travel pressure and pilot pressure where applicable. Check the travel motors for excessive case drain leakage. Inspect hydraulic hoses and fittings for restriction or damage.
If the machine has one weak travel side but the hydraulic pressure is normal before the swivel joint and low after it, internal center joint leakage becomes much more likely.
Tools and Preparation:
- Suitable hand tools
- Hydraulic line plugs and caps
- Drain container
- Cleaning materials
- Lifting equipment if required
- Torque wrench
- Replacement seal kit
- Hydraulic oil
- Machine service manual
Due to significant structural differences among excavators from manufacturers such as CAT, Komatsu, Hitachi, Doosan, Hyundai, and Volvo, the specific disassembly and assembly sequences and torque specifications must be based on the service manual for the specific model.
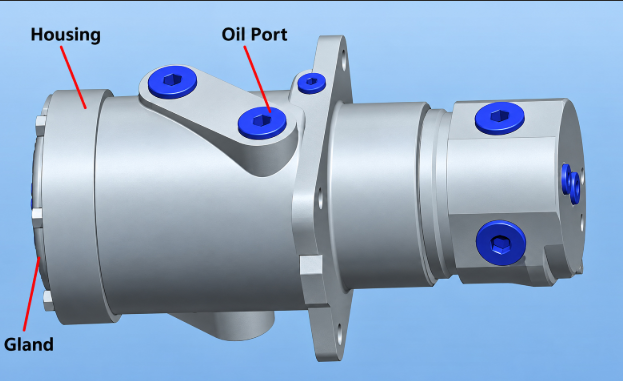
4.How to Remove and Rebuild an Excavator Center Swivel Joint
A typical service procedure can be divided into the following steps:
Step 1: Park the Excavator Safely
- Park the machine on level, solid ground.
- Lower the bucket and other attachments completely to the ground.
- Shut off the engine and remove the key.
- Release residual pressure from the hydraulic system.
- If work must be performed underneath the machine, ensure it is securely supported; do not rely solely on the hydraulic system to maintain its position.
Step 2: Clean the Center Joint Area
The central swivel joint is typically located at the bottom center of the machine, where mud, grease, and dust tend to accumulate. It must be thoroughly cleaned before disconnecting the lines.
This helps prevent: Dirt → Hydraulic line → Main valve / pump / travel motor
Hydraulic contamination is a major cause of new malfunctions following maintenance.
Step 3: Mark Every Hydraulic Hose
This is a very important step when removing the center swivel joint.Before disconnecting any hydraulic lines, number each line.
For example:
A1 → A1
A2 → A2
B1 → B1
B2 → B2
You may also use color-coded tags. Do not rely on memory when reconnecting lines. If the left/right travel hydraulic lines or the high-pressure/return lines are connected incorrectly, serious malfunctions may occur when the machine is restarted.
Step 4: Release Hydraulic Pressure
Ensure the engine is shut down and release the hydraulic system pressure in accordance with the equipment maintenance manual.
The hydraulic system may retain high residual pressure even after the engine has been shut down.
Never loosen a hydraulic fitting while the circuit is still pressurized.
Step 5: Disconnect Hydraulic Lines
Disconnect the hydraulic lines connected to the center swivel joint one by one.
Immediately after removal: Plug the hose + Cap the center joint port
This makes it possible to simultaneously prevent:
- Hydraulic oil contamination
- Dirt entering the system
- Excessive oil leakage
- Incorrect hose connection
Step 6: Remove the Center Swivel Joint
Remove the mounting bolts, brackets, or locking mechanisms securing the center swivel joint, in accordance with the machine’s structure.
On some models, the entire center swivel joint can be removed from the bottom; on others, it may be necessary to first remove surrounding guards, the swivel joint mounting bracket, or other components.
Do not lift the center swivel joint by its hydraulic fittings or oil lines. Doing so can easily cause deformation or damage to the fittings.
Step 7: Disassemble the Center Joint
End cover → Retaining components → Rotor/Shaft → Seals
Step 8: Inspect the Rotor and Housing
Check Rotor / Shaft for the existence of:
- Scoring
- Grooves
- Corrosion
- Uneven wear
If distinct grooves have already formed on the sealing surface, internal leakage may quickly recur even after installing a new O-ring.
Check Housing for the existence of:
- Seal grooves
- Hydraulic passages
- Internal bore
- Cracks
- Abnormal wear
Check Seals for the existence of:
- Hardening
- Cracking
- Flattening
- Cutting
- Extrusion
- Heat damage
These traces help determine the root cause of the fault.
Step 9: Install the New Seal Kit
Before installation, apply a small amount of clean hydraulic fluid or the assembly lubricant specified by the manufacturer to the surface of the seal.
When installing O-rings and backup rings, avoid:
Twisting, cutting, excessive stretching, or incorrect installation orientation.
Do not use a sharp screwdriver to directly pry or press the seal.
Step 10:Reassemble the Center Swivel Joint
Proper alignment must be maintained when installing the new rotor/shaft. Forcing the shaft into the housing can easily damage the new O-ring; therefore, the assembly process should be performed slowly and evenly.
Once assembly is complete, verify that the rotating components move correctly according to design specifications, and tighten the fasteners to the torque values prescribed in the maintenance manual.
Step 11:Reinstall the Center Joint
Reinstall the assembly at the center of the machine.
Verify:orientation is correct.
Then, install the mounting bolts and brackets. Afterward, reconnect the hydraulic lines one by one, following the labels and photos from the disassembly process.
Ensure there are no:twisted hoses, incorrect ports, loose fittings, or hydraulic hose interference.
Step 12:Start and Test the Excavator
Do not perform high-load operations immediately after completing repairs. Start the engine and maintain a low idle speed.
First, check:External oil leakage
Then proceed slowly with:
- Forward travel
- Reverse travel
- Left travel
- Right travel
- Upper structure rotation
Gradually increase the load only after confirming there are no irregularities.
Finally, compare the left and right travel performance.
Measure again if necessary:
Travel pressure / pilot pressure / case drain flow
Confirm that the fault has been eliminated.
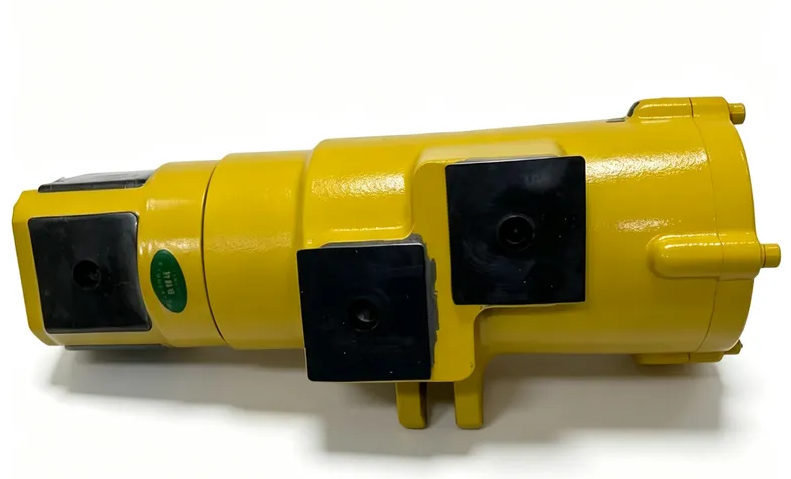
5.Common Mistakes When Replacing Center Joint Seals
- Failure to mark hydraulic lines, leading to incorrect reconnection
- Failure to clean components before disassembly, allowing contaminants to enter the hydraulic system
- Forcing the rotor in, damaging the new O-ring
- Replacing seals without inspecting the shaft groove
- Using an O-ring of similar dimensions but the wrong material
- Incorrect tightening torque for hydraulic fittings
- Proceeding directly to heavy-load operation without performing a low-pressure test
Any of these issues can lead to a recurrence of leaks shortly after repair.
6.Should You Replace the Seals or the Complete Center Joint?
If the issues with the center swivel joint are limited to: Hardened or worn O-rings
The rotor and housing remain in good condition, replacing the center joint seal kit will usually resolve the problem.
However, if there are:
Deep shaft grooves, severe bore wear, cracks, or significant deformation
Simply replacing the seals may not fix the internal leakage.
In this case, you should consider:
Rebuilding the center joint or replacing the complete center swivel joint.
Conclusion
The center swivel joint is a critical component of an excavator’s travel hydraulic system, yet it is also a part where misdiagnosis frequently occurs.
When the machine exhibits symptoms such as:
weak travel on one side, travel deviation, pressure loss, or oil leakage at the center joint,
Hydraulic pressure, pilot pressure, and travel motor leakage tests should be performed before deciding whether to disassemble the center swivel joint.
The key to proper removal and installation lies not merely in the act of taking the unit off, but in:
Maintaining the cleanliness of the hydraulic system, accurately marking all hydraulic lines, protecting new seals, and reassembling the unit in strict accordance with the maintenance specifications for the specific machine model.
FAQ
1.What are the symptoms of a bad center swivel joint?
Common symptoms include weak travel on one side, uneven travel speed, the excavator pulling to one side, hydraulic pressure loss, internal leakage between circuits, and external oil leakage around the swivel joint.
2.Can a bad center swivel joint cause weak travel?
Yes. If the internal seals are worn or damaged, high-pressure oil can leak into another passage or return circuit, reducing the pressure and flow reaching the travel motor.
3.Can a center swivel joint cause an excavator to pull to one side?
Yes. Internal leakage in one travel circuit can reduce power to one track, causing the excavator to travel unevenly or pull toward one side.
4.How do I know if the problem is the center swivel joint or the travel motor?
A travel motor fault often causes excessive case drain leakage, while a center swivel joint fault may show pressure loss between the upper hydraulic circuit and the lower travel circuit. Pressure and case drain testing can help identify the actual source.
5.Can an excavator center swivel joint be rebuilt?
Yes. If the rotor, housing, and sealing surfaces are still in good condition, the joint can often be rebuilt using a new seal kit. Severe wear, cracks, or deep grooves may require a complete replacement.
6.What seals are used inside a center swivel joint?
Most center swivel joints use O-rings, backup rings, dust seals, and sometimes wear rings or additional sealing elements. The exact seal arrangement depends on the excavator model and center joint design.
7.Why do center swivel joint seals fail?
Common causes include normal wear, contaminated hydraulic oil, high operating temperature, pressure spikes, incorrect seal material, damaged sealing surfaces, and excessive internal clearance.
8.Do I need to remove the complete center joint to replace the seals?
It depends on the machine design. Some excavators require the complete assembly to be removed, while others allow partial disassembly. Always follow the service procedure for the specific excavator model.
9.What should I check before removing the center swivel joint?
Before removal, check travel pressure, pilot pressure, travel motor case drain flow, hose condition, and main control valve operation. This helps avoid removing the center joint unnecessarily.
10.Can I reuse the old O rings when rebuilding the center joint?
No. Old O rings should normally be replaced during a rebuild. Reusing worn seals can lead to immediate leakage or early failure.
11.Should the center joint shaft be inspected during seal replacement?
Yes. The rotor or shaft should be checked for grooves, scratches, corrosion, and uneven wear. New seals may fail quickly if the sealing surface is damaged.
12.What happens if the center swivel joint hoses are connected incorrectly?
Incorrect hose routing can cause abnormal travel direction, weak travel, cross-circuit pressure problems, or hydraulic component damage. Every hose should be labeled before removal.
13.Can dirty hydraulic oil damage a center swivel joint?
Yes. Contaminated oil can damage seals and scratch the rotor or housing surfaces, increasing internal leakage and shortening the service life of the joint.


